I have started my tomato season. Don't they just look delish? To get these yummy fruits, I have to start the seeds in my home.
I'm growing my tomato plants inside the house, because we are still likely to get frost. These days you can find great containers in stores like Home Depot and Lowes, add great garden soil and your set! I planted these about a month and a half ago:

Here is my row of seedlings. They may not look like much right now, but they will deliver gorgeous tomaotes this summer!
These seedlings are too crowded, I need to space them out to one plant per small cube.
I make a small hole in a new container and transplant the extras, but watering them first, so they pull out easy. Note the little hole on the bottom left.
Some will not get the entire root w the pull, but no worries, you can just discard the extra. If you save them and crowd the pot, none will survive.

In this pot I planted new seeds. I had used old seeds that the kids had colored on the packets, so several were crushed. I tried them anyway, but all of them did not grow. ;-/ After planting the new seeds, I simply side the empty seed packet on the side so that I can remember what type of tomato I planted in each container. That way, next year you will know which type of tomato grew best for you, and which ones your family liked the most.

Under way with transplants, note the small four holes awaiting a little guy seedling. At the top, several cubes still have two plants. One will have to be pulled and discarded.
These store purchased containers are nice, but I find they can get expensive, so I buy the biodegradable trays (cheap) and use the plastic tubs lid as a base too. Note I sit them on towels to protect my table from condensation, or water drips when I water them.
Larger picture of the lid used as a base, next to an actual base. My cat was helping me take off the plastic wrap in this picture. My helper...
My helper is again in this picture. I use plastic wrap instead of the lid when I have "borrowed" their lids to use as a base. The seeds need a terrarium atmosphere to grow in. With the lid, condensation will form on top of the plastic, keeping the seeds moist. They will not grow dry, without sunlight, or in the cold. The nutrients they will get from a good garden potting soil.

Once they are good size seedlings, you can remove the tops. In may case, however, I have to keep them somewhat covered because of the furry helper you saw in the pics. Big fat cat paw prints in my seedlings is not good for the plants.
These little guys will continue to be lightly watered until they find their home outside.
Here are some tomato plants from last year. See the green fat fruit? Yummy! It is hard to belive that it all comes from a tiny seed like this one:
So many tomatoes, so little time to eat them, lol... I love to plant many different colors and sizes of tomatoes. You can even grow tomatoes with zebra stripes of a purplish color mixed with red, they are so cool!
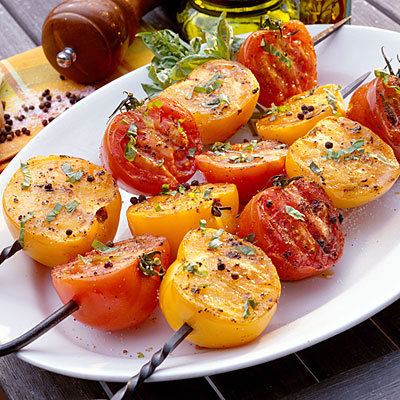
I have to admit, come tomato season, I can eat my weight in tomatoes; I love them! Then comes the eatting, and cooking with them; these were simply grilled w a few herbs and olive oil added to them (balsamic vinegar is also a wonderful flavor to add).
I dedicate a full retangle of my vegetable garden to them, and additionally, I have three container gardens for them. If you want to can tomatoes, make sure you grow enough plants to be able to eat them raw and can. Canning will take a lot of tomatoes, because it condenses them.
YuMMy!!! Enjoy your tomatoes! ;-D


 Here is my row of seedlings. They may not look like much right now, but they will deliver gorgeous tomaotes this summer!
 Under way with transplants, note the small four holes awaiting a little guy seedling. At the top, several cubes still have two plants. One will have to be pulled and discarded.


 Once they are good size seedlings, you can remove the tops. In may case, however, I have to keep them somewhat covered because of the furry helper you saw in the pics. Big fat cat paw prints in my seedlings is not good for the plants.


No comments:
Post a Comment