Welcome

I've been asked to begin a blog that shows a "how-to" for the things that bring pleasure to my life. So, the intent of this blog is to share recipes, gardening, composting, sewing, crafts, art, everyday projects and even psychology tips to aid in healing wounds and living the life you're meant to live, a life with purpose!
Art PrintsArt Prints

Friday, February 25, 2011

Leek Quiche: Gardening, Recipe, How to use Vegetables.

Last night I made two quiches and a wonderful Beet and Citus Salad. The surprise came from our quiches. I make a crab quiche, it is the one pictured in the green quiche pan; normally it is the star of the dinner-show. However, last night, this Leek Quiche outshined (Forteen dollars worth of crab in the crab quiche) and was the favorite dish by far. By the way, the leeks cost $2.99 a pound, and the recipe calls for a half a pound... You do the math!
Ingredients:
Crust:
1 Tbl butter
3 Tbls canola oil
1 C flour
¼ tea salt
Leeks are the star in this dish. Do not let their humble appearance fool you, they are packed with flavor!

Filling:
2 tea olive oil
½ lb (about 2 packed C’s) thinly sliced leeks, wht and light green part only, washed thoroughly because they are sandy and dirty in the light green part. I let the water wash into the leaves upright until I do not see brown. Then I thinly slice them and wash the cut up pieces in a colander. Otherwise your food will taste like dirt. They are so worth the effort in taste!These green babies pack an awesome tasting low-fat quiche! These vegetables are in the onion and garlic family of plants, so if you have not tried them, and you love onions or garlic, you're in for a treat!
2 lg eggs
4 lg egg whites (discard yolks) or use in a Hollandaise sauce or something.
¾ C evaporated milk
¾ C skim or low-fat milk
¼ tea sea salt
¼ tea freshly ground blk pepper
¼ tea freshly grated nutmeg
Pinch of cayenne
1 tea Dijon mustard
1 Tbl fine dry breadcrumbs
4 oz (1 C) grated Gruyere cheese
¼ C freshly shaved Parmesan cheese
Disclaimer: the photo came from Obesity AID.Org.

Directions to make a very delish crust with half the fat of a regular crust: (Or skip step; crust steps 1-4, and go right to step 5, using a refrigerated rolled pie crust found in the dairy section of your grocery store.)
1.   Preheat oven to 425 degrees and place rack in lower third of oven. Use cooking spray like Pam Olive oil to spray your glass or pottery quiche or pie dish. I do not like metal pans for this; however if you use one, use care to not burn the crust at the bottom of the pan.
2.   In a small saucepan, melt butter over low heat. Swirling the pan, cook butter for about 30 seconds, until it is a light nutty brown. Be careful to not burn your butter. This browning will bring the flavor out of the butter. Pour into a small bowl and let it cool. Add the canola oil.
3.   In a medium bowl, mix flour and salt. Using a fork, slowly stir the butter-oil mixture into the flour mixture until it is crumbly. Gradually stir in enough ice water (about 1-2 Tbls) for the dough to hold together. Gather the dough into a ball.
4.  Place dough between two sheet of plastic wrap and flatten into a round disk. Roll into a 12 inch circle. Remove the top of plastic sheet and roll it onto your rolling pin without the plastic wrap. Place on your quiche or pie pan, centering it. If your dough is large enough for a rim, fold edges under and crimp. If your pan is large and your dough just comes up halfway on the side of your pan, just mold it to your quiche dish (I use large quiche pans, so this is what I do).
5.  Line dough with a piece of foil or parchment paper large enough to lift our easily; fill evenly with dried beans (Or pie weights if you have them). This will prevent your crust from coming off the pan and forming a tent, instead of the pie shell you desire. Bake for 7 minutes. Remove paper and beans and bake for 3 to 5 minutes longer, until lightly browned. You do not want the crust to be fully baked. Cool crust.

Directions for the Filling:

1.   Reduce oven temperature to 350 degrees.
2.   Meanwhile in a skillet, heat olive oil over low heat. Add leeks and cook, stirring occasionally, for 15 min's, or until leeks are soft, wilted and barely brown at some edges. Set aside to cool.
3.  In a large bowl, whisk eggs and egg whts. Stirring gently to avoid creating bubbles. Add evaporated milk, skim milk, salt, pepper, cayenne red pepper, and nutmeg (I use a small grinder and grate fresh nutmeg—the flavor is wonderful, if you cannot find a ball of nutmeg to grate, then the dry powder can be used).

Assembly Line time:

Directions to Assemble Quiche:

1.   Spread mustard over the bottom of the prebaked crust; sprinkle evenly with breadcrumbs.
2.   Top with Gruyere, then the cooked leeks.
3.   Carefully pour in the egg mixture.

Disclaimer: Image from Stockphoto.
4.   Sprinkle with Parmesan.  

5. Now that the assembly is complete. Bake for 25 minutes, just until a knife inserted in the quiche will come out clean; meaning the quiche is now set and no longer a liquid.
6.  Let cool for 10 minutes, the setting process continues as it cools. Slice into pie pieces.

Thursday, February 24, 2011

Brie for a party or brunch: Easy Recipe

A neighbor and friend's daughter requested this recipe. I had made a brie for her mother's 50th birthday party. I could not remember which toppings I used on that brie, because the options are limitless and I like variation, hee... So, this recipe covers all the options for a brie.
Ready to cut into this baby? Yum.

Ingredients:
3/4C. apricot, raspberry, or favorite preserves, I usually use raspberry and slivered almonds.
(Optional) An additional 1/2 C preserves; decide what toppings you want in your brie, instead of preserves you can use Brown sugar, Pecans, fresh cut up apples, or fresh Berries, etc. Bries can also be savory instead of sweet by using ingredients like rosemary and chives instead of the preserves or fruit.

Pictured is phyllo dough, thin sheets that have to keep moist until used, or they will dry out. They make a very flaky crust, perfect to wrap a brie in!

1 6 inch wheel Brie or Camembert cheese
phyllo dough, 10-12 sheets, thawed if they were frozen
1/2 c. butter, melted                                              

Directions:  1. Preheat oven to 400 degrees.  Make a egg wash by mixing an egg with 1 Tbl of Milk.
2. Brush butter over each sheet of phyllo dough, one at a time, and place in a pie plate or quiche dish, with the ends hanging over the edge. (Keep unused phyllo covered with damp cloth while wrapping Brie or it will dry out and be unusable.) Cut the dough on the edges if necessary to make them more even.

Note the red topping in the center of this brie. This brie was wrapped with puff pastry instead of the phyllo dough. Another good option for a crust; however, I prefer the layers of the flaky phyllo these days.
2. (optional step) Cut the brie along it's length to insert a topping of your choice (so that it will be in the middle of your brie). Topping can be a preserve, a mixture of brown sugar and pecans, fresh cut apples, fresh berries, etc.     
3. Place bottom of brie in the center on top of the buttered dough sheets. Note: If you choose to not cut the brie, so that there will not be a topping in the middle; Simply put the whole brie in the center of the buttered dough sheets.
4. If you cut the brie in half, now put your topping on the bottom brie half, and then add the top of the brie.

This brie only has a top topping; it was not cut into two pieces, so it will not have a topping in the middle. Either way, you will have a delish brie to dip in!

5. Spread the remainder of the jam or preserves on the top of the brie.
6. Bring the edges of the phyllo dough up over the top and seal well, using the egg, milk wash, (or some cooks just continue to use butter).
7. After you have wrapped the entire brie, you can twist the top, or make the top a dough decoration like a bow. Or just leave it twisted together.  
8. Brush the top with the egg milk wash. (Or just butter if you prefer). Either will help the pastry to brown. The egg wash is an old baker's tip used on pies; I prefer to use a light egg wash on my pies.
9. Cook in a 400 degree oven for 15-20 minutes, depending on your oven. I usually set the timer for 12 minutes and start watching it because I use a convection oven. Pull it out once it has a golden brown crust.  
 Enjoy! ;-)

Tuesday, February 22, 2011

My kids and I received a beautiful gift in the mail, Remembrance Bracelets

What a wonderful way to honor the loss of a loved one: 

My sweet niece had these bracelets made in honor of her uncle, my husband Mike. I thought it was such a nice thing for her to do. She wanted to do something in remembrance of her Uncle Mike. She sent enough for all of us to wear. I still have to get my two oldest kids theirs, but Adler and I have been wearing ours.


Thank you, Emily for the sweet bracelets! I have mine on as I type this now. ;-)

The Cutest Thank You NoTe!

I just found the sweetest note in my mailbox!

Remember my friend who had the child who had sinus surgery and she asked me to make her Chicken and Dumplings? Well, this is how she said thks... too cute! Hope it makes you smile like it did me.

I have a feeling her daughter is the one who made the note. ;-)
Her daughter is doing well and has recovered. This is the follow-up from the posted chicken and Dumpling recipe. What a sweet ending to the story! http://lisakramerartlifestyle.blogspot.com/2011/02/chicken-n-dumplings.html

Monday, February 21, 2011

Roasted Cauliflower Risotto: Recipe

Due to a few requests for the side dish that went well with the Balsamic Glazed Filet and Radicchio dinner at link: http://lisakramerartlifestyle.blogspot.com/2011/02/reduced-balsamic-glaze-on-beef-filet.html (or it is simply the recipe beneath this one as you scroll down); here is the recipe for the risotto.
The flavors of the radicchio can be described as spicy or bitter, which is why sugar and the sweet acidity of the balsamic made that meat dish pop!
The risotto is a creamy starch that takes on a nutty flavor with the addition of almonds and their crunch. However, what makes this dish pop is that the roasted cauliflower takes on a smoky flavor from the roasting process. This meal is a flavor explosion! You will be dipping for seconds. ;-)
Ingredients:
Risotto can be tricky; it is simply a matter of timing. So, again I stress the need for a kitchen timer. Risotto is not an ingredient you can take shortcuts with; it needs time to absorb each ingredient in a process. This is why some people think only chiefs can cook risotto.  If you follow the steps with a timer, you will be amazed at how creamy this dish can be.—If is not really that difficult; you just have to pay attention to the grain. ;-)
Cauliflower is a very versatile vegetable that once you start using it, you will find it fast becoming a staple side dish to many of your meals. It is perfect for roasting!

1 head cauliflower, florets cut into ½ inch pieces for the topping
3 Tbl extra-virgin olive oil
Chopped stems to mix with the risotto on the stove, not to be roasted in the oven with the florets.
Sea Salt and freshly ground pepper
¼ C sliced almonds
1 finely chopped large onion
1 ½ C Arborio short-grain Italian rice (or short-grain rice vialone nano or pkg that says risotto)
2 smashed and minced garlic cloves
½ C dry wht wine
3 C’s low-sodium chicken broth
2 Tbl unsalted butter
4 oz. (1 ½ C) grated or finely chopped Italian fontina cheese
½ C roughly chopped fresh parsley
Directions:
1.   Preheat oven to 475 degrees.
2.   Toss the cauliflower florets with 1 Tbl olive oil on a baking sheet. Spread in a single layer and season pepper and with salt like you would French fries. Roast on upper oven rack, 5-10 min’s, you have to watch it get just a bit browned at edges.
Pictured: a variation of golden and brown raisins can be added to the cauliflower to add a touch of sweet to the roasted mixture. Play and see what your family likes the best.
Pictured: a variation of garlic can be added. Roasted garlic is delish!
3.   Then add the almonds and roast about 5 min’s more, until almonds are roasted, but not burnt, not dark brown. This step is a much watch closely process. I set my timer at the 5 min mark and then watch close; nuts can burn quick.
4.   Meanwhile, heat the remaining 2 Tbls olive oil in a Dutch oven (large ovenproof saucepan with a lid) over high heat. Add the onion and cauliflower stems and cook, stirring, until the onion is translucent, about 3 min’s.
5.   Add the rice and garlic and cook, stirring, 2 min’s.
6.   Add the wine and cook, stirring, until evaporated, 1 min.
7.   Add 3 C’s broth, 2 C’s water and 1 tsp salt; cover and bring to a boil.
8.   Transfer the pot to the lower oven rack and bake until the rice is tender, about 15 min’s.
9.   Remove the rice from the oven and add the butter, fontina and parsley, stirring vigorously until the risotto is creamy, 1 to 2 min’s. At this point you want to serve immediately; you want the parsley to stay bright green, not over cooked and bland in color.
10. Serve family style in a decorated bowl, or divide among bowls, topping with the roasted cauliflower and almond mixture.

Sunday, February 20, 2011

Reduced Balsamic Glaze on Beef Filet with Wilted Radicchio: Recipe.

I made this meal last Thursay and to fullfill requests for the recipe; I am sharing the secret ingredients. ;-) It was served with Roasted Cauliflower Risotto; it turned out to be a great compliment to the dish. I was a bit under the weather today, so a perfect day to do a little typing. I hope your family enjoys this recipe too.
Balsamic Beef:
Beef tenderloin is kinda a "Go-To" meal around here. I am thinking back and I am realizing we use it frequently for dinner parties. ;-)

A rare tenderloin with green beans and a horseradish sauce.
Ingredients:
I recommend investing in a kitchen timer. I use mine all the time because it is too easy to talk with guests and lose track of time and ones' food that is cooking. 
4  -6 oz. beef Filet, or Tenderloin, (I used two large thick filets the last time I made it). A Filet is simply a whole tenderloin that has been cut into pieces. You can substitute eye round steaks, for budget reasons; however, not nearly as tender or tasty.
Sea salt, freshly ground pepper
3 Tbls unsalted butter
1 to 2 tea sugar (basically a pinch to ea. side of the steaks, or tenderloin)
2 smashed and diced garlic cloves
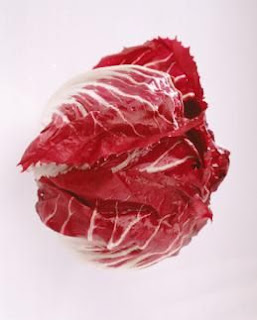
2 heads radicchio, torn into pieces, taking out white core
1/8 C julienne cut or thinly sliced sun-dried tomatoes
¼ C aged balsamic vinegar
½ C low-sodium chicken broth, plus more if needed
½ C fresh sliced basil leaves, plus leaves for topping (do not skimp on the basil)
A hot iron skillet with meat that has a browned crust and a raw center.

Directions:
1.   Heat a large skillet over high heat until it is smoking a bit. You want it to be very hot to seal and brown the outside of the meat, keeping the inside rare.
2.    Season the steaks w salt and pepper. Then sprinkle them w a pinch of sugar.
3.    When the pan is starting to smoke, add 1 Tbl butter to coat pan.  
4.    Add the steaks and sear until golden brown on the bottom (no more than 4 min’s).  You will only turn the steaks once. Flip and cook until golden on the other side (2 min’s). (*Note: a very hot skillet is key to getting a good crust or brown seal on your meat).
5.   Transfer to a cutting board and tent w foil. You do not want to leave it in a hot pan, or warming oven because it will continue to cook, taking you away from rare. The tenting with foil will allow the meet to stay warm without cooking it more.
6.   Reduce the heat to medium and add 1 Tbl butter to the skillet. Add the garlic, cook 20 sec’s. Scrape the meat pieces off the skillet and into the new sauce you're making.
7.  Add the radicchio in batches. Tossing until wilted. Sprinkle with 1 tea sugar and ½ tea of sea salt.
8.   Add the sun-dried tomatoes and vinegar and cook until the vinegar evaporates slightly, (1 minute).
9.   Add the broth and cook until the radicchio is tender, about 2 minutes. Stir in the basil. Transfer the radicchio to the platter using tongs.
10. Continue cooking the sauce until it slightly thickens, 1 to 2 minutes. Stir in the remaining 1 Tbl butter.  Balsamic reduction is about taking out some of the water to make a sweeter and more concentrated sauce (hence, the slightly thicker version). If however, you mistakenly over reduce, by letting it cook to long, losing to much liquid; you can add some chicken broth to bring “back” your sauce.

11.   Thinly slice the steak and lay it out. Drizzle meat down the middle with the sauce and top with fresh basil for garnish and add a bit of “fresh” to the dish.

Serve on a plater with the Balsamic glaze down the center of the meat and the Wilted Radicchio along it's side. Top with fresh basil leaves.

Labels